Introduction
If you’ve used iCloud, Google Drive, Dropbox, or any other major file syncing service on macOS, you will have noticed that files only get downloaded as you interact with them. These services use Apple’s FileProvider API to achieve this.
The FileProvider API gives developers a number of tools to present files to users via a special filesystem through Finder. It in effect replaces a bunch of older solutions for on-demand file sync with a simple API that is developed by Apple and fit for use on macOS, iOS, and derivatives. It makes it pretty easy to develop your own on-demand sync client, provides a nice user experience that integrates well with the OS, and is cross-platform. Unfortunately, the documentation is a bit sparse, so this post will go over some of the basics.
This guide is intended for developers building file sync features on Apple platforms who are new to the File Provider API, or those looking for information beyond the official API documentation.
Most of the information in here has been gathered from my own experience working on the Nextcloud desktop client and it’s File Provider Extension. If you are interested in seeing a real, working, open-source/free-software example of a real sync client using the File Provider API, you can look into:
- The code for the FileProviderExt app extension provided by the Nextcloud desktop client
- NextcloudFileProviderKit, the framework that provides the bulk of the functionality used by the aforementioned app extension
- The code for the FileProviderUIExt app extension which provides some Finder context menu integration
- The code for NextSync which is built to be multi-platform
- Apple’s FruitBasket sample app.
I will only be covering the newer NSFileProviderReplicatedExtension in this article, as well as the parts of the File Provider API that I have interacted with. I will update this doc as that changes!
What you will need
- macOS 11.0+ / iOS 16.0+
- Some existing code to interact with your remote file
Architecture
The role of your File Provider Extension
In order to actually display files and handle file operations, you will need to provide a File Provider Extension. This is an App Extension that is shipped with your application bundle and gets loaded by the system at runtime. Each File Provider domain – think of this is a remote location you are displaying locally – will instantiate a new process using your File Provider Extension.
The main role of a File Provider Extension is to inform the system of what file system state needs to be replicated locally. There are, in practice, three states you must be mindful of when developing your File Provider extension. These are:
- The remote state, maintained by the sync service’s server
- The “middle-man” state, maintained by you and your File Provider extension
- The local state, maintained by macOS/iOS/visionOS
At any given time, the remote state can change, as can your local state. Your job as the File Provider Extension developer is to keep track of what has changed, where it has changed, and how to reconciliate the changes on both sides to keep sync harmonious.
In practice, this means you need to keep track of what your current knowledge of the remote state is. At Nextcloud, we do this by keeping a database of discovered and synced remote files. When things change remotely, we compare the remote files to what is in the database so we know what changes we need to make locally.
Unless you plan on only supporting one File Provider domain in your application, you will need to store remote state in a way that is accessible by multiple processes concurrently. To save yourself the trouble, I recommend you keep one database/data store per domain.
Thankfully, keeping track of local changes is much easier as the system will immediately wake up and notify your File Provider extension when these changes happen. This saves you from having to monitor the local filesystem yourself.
The role of your main application
Though the File Provider Extension takes care of file operations, your main application needs to perform some setup in order to load in a File Provider Extension. Here is where File Provider domains are key.
As we discussed previously, File Provider Extensions are loaded on a per-domain basis. Typically sync services instantiate a File Provider domain for each user or remote location configured in the application.
Bare minimum implementation
Before diving into all the details, what’s the absolute minimum to get something showing up in Finder/Files? You’ll need:
- An App Extension target using the “File Provider Extension” template in Xcode.
- Correct App Group entitlements set up for both the main app and the extension.
- In your main app, code to add a
NSFileProviderDomain.
File Provider Extension Overview
To write a functional FileProvider sync extension, you will need to implement four basic operations:
- Enumeration: effectively a remote
ls, listing the metadata of a given item, and in the case of a folder item, it’s subitems - Creation: propagating the creation of a local item to the remote location you are syncing to
- Modification: propagating the modifications of a local item to the remote – including metadata and content changes
- Deletion: propagating the deletion of a local item
- Fetching: retrieving the contents of a remote item, thereby making it available locally (in Apple parlance, materialising it).
Unless you are operating a sync service that is targeting use on only one device, you will also want to notify the system that new, un-synced remote changes need to be synced.
Creating the File Provider Extension target
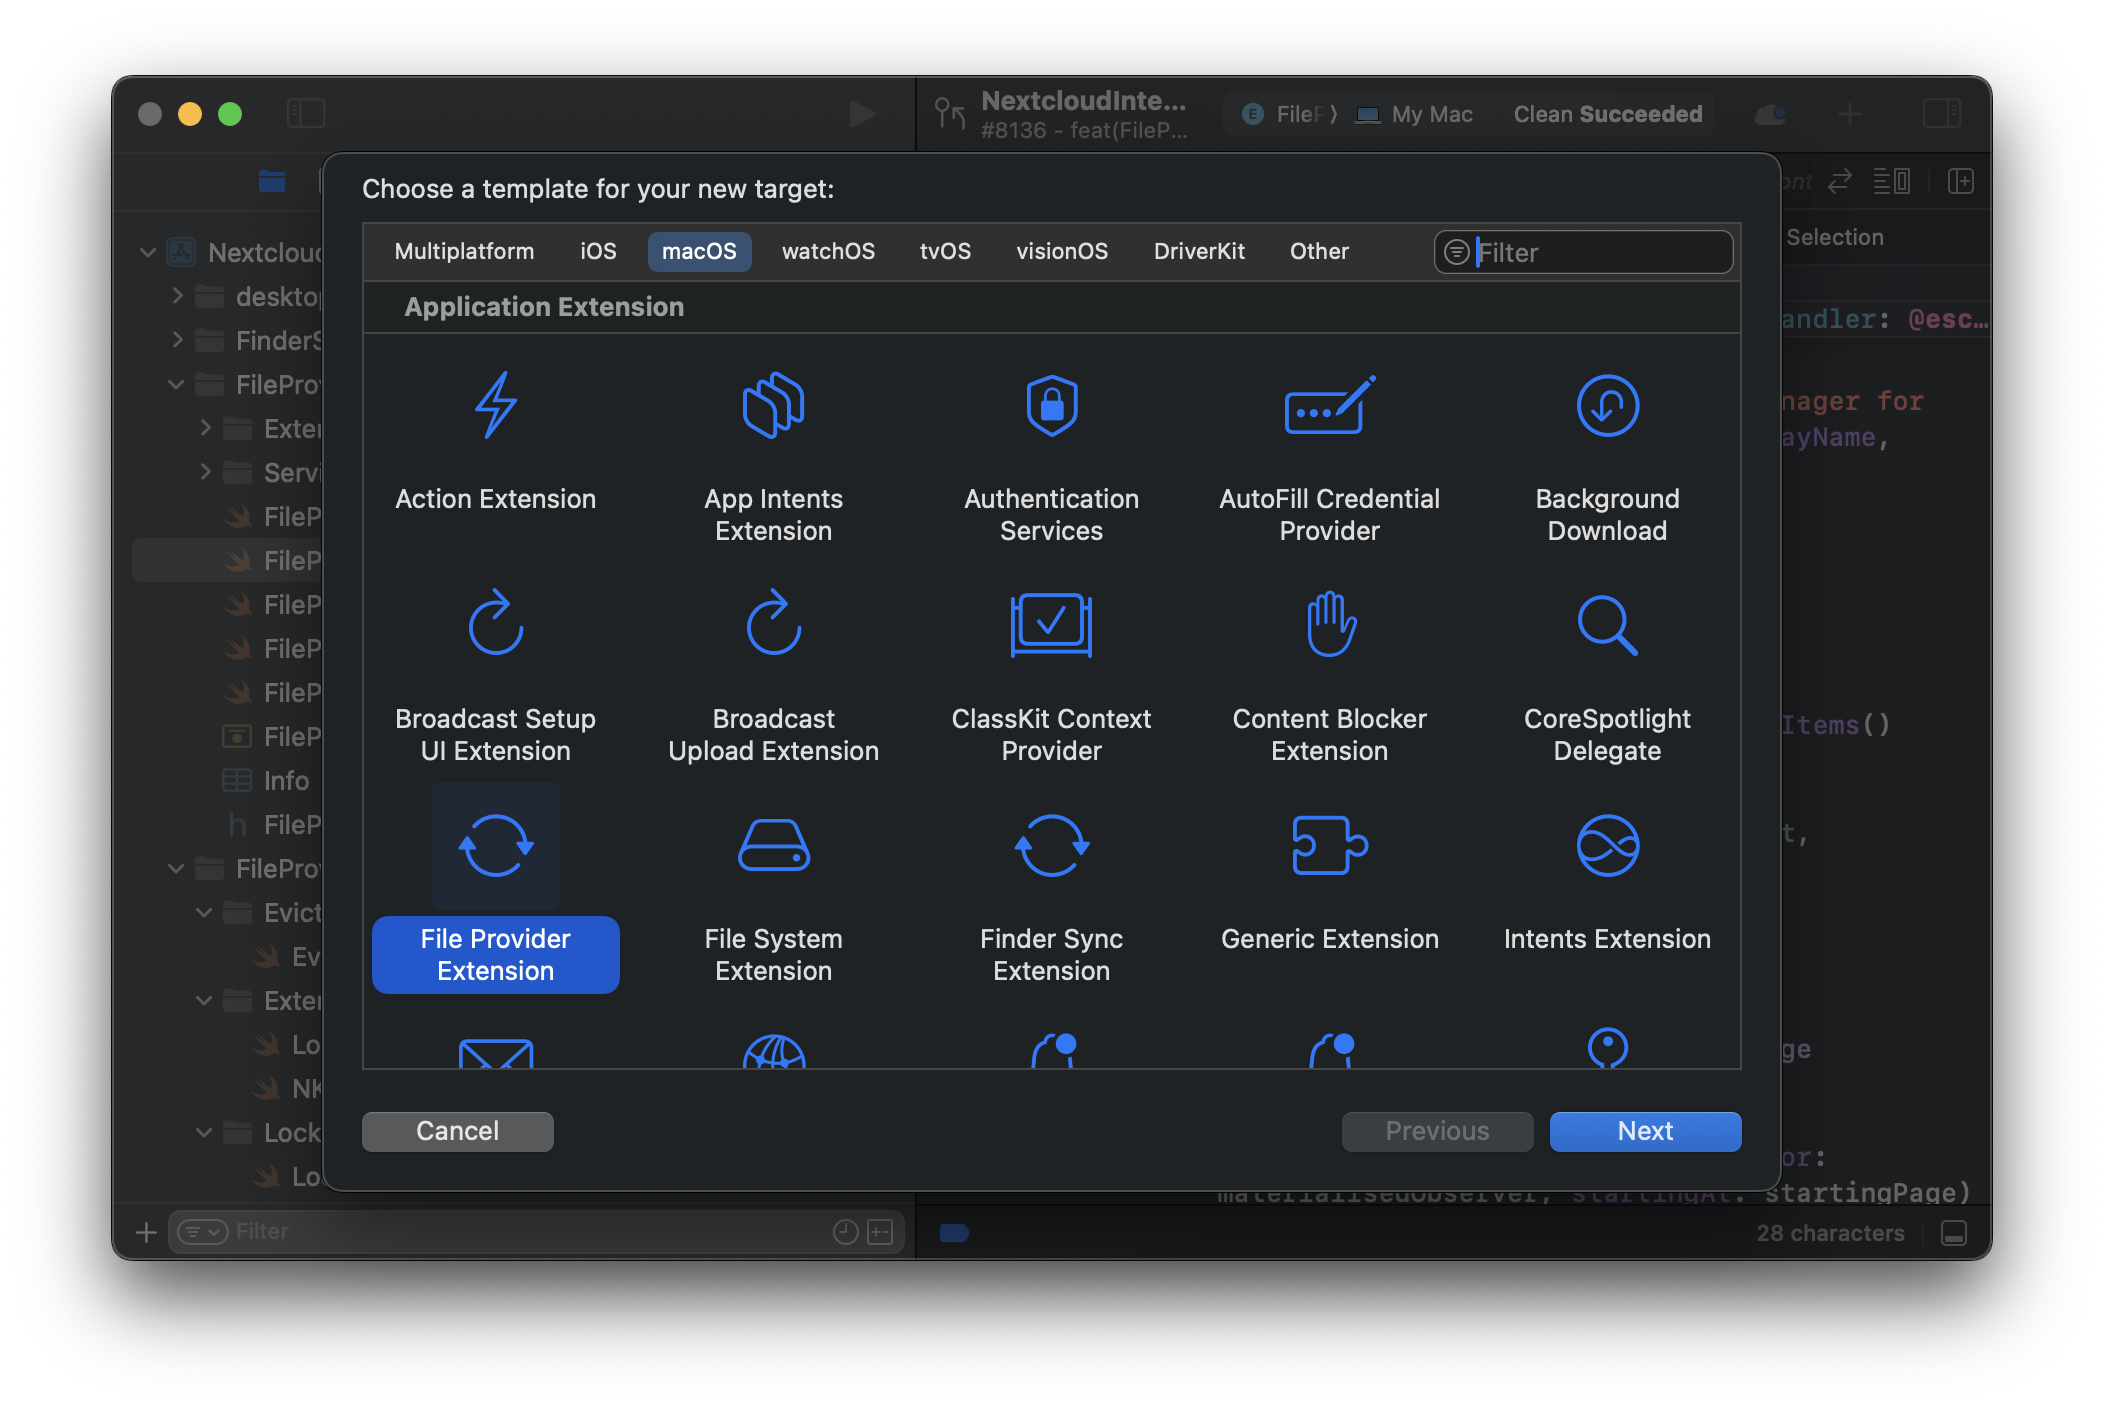
Xcode now offers an Application Extension template that provides you with all the necessary files to create your own File Provider Extension. Though it is not listed as a multiplatform template, both the iOS and macOS templates are practically the same.
The one area where they differ is entitlements. Specifically, the app group identifier. You must provide a consistent app group identifier across both your app and File Provider Extension in order for the system to correctly execute your extension.
This forum post from Apple legend Quinn “The Eskimo!” goes into the specifics, but to summarise:
- macOS: app group IDs start with your Team ID, for example,
SKMME9E2Y8.eskimo1.test. You must also claim the app group ID in the App Groups entitlement. - iOS and derivatives: app group IDs start with
group., for example,group.eskimo1.test. You allocate it on the Developer website. This assigns the app group ID to your team. You then claim access to it by listing it in the App Groups entitlement(com.apple.security.application-groups) entitlement. That claim must be authorised by a provisioning profile.
Please pay attention to this as improperly dealing with the app group identifier can lead to the system refusing to run your File Provider Extension!
For an example of a real project using one File Provider Extension target for iOS, iPadOS, visionOS, and macOS, you can explore my NextSync project on GitHub
The NSFileProviderItem protocol
The Item class you build that implements the NSFileProviderItem protocol will provide all the metadata the OS needs to handle file operations and to display data to the users. A large number of this protocol’s properties are optional, but you should ideally seek to implement as many of these as you can. The properties described below are the most important to implement:
Properties
The obvious ones
var filename: String- The file transfer properties (
isUploaded,isUploading,uploadingError,isDownloading,isDownloaded,downloadingError) - The sharing properties (
isShared,isSharedByCurrentUser,mostRecentEditorNameComponents,ownerNameComponents)
The less obvious ones
var itemIdentifier: NSFileProviderItemIdentifier
This is a unique identifier the system will use to inform you which item is the subject of a given request to an NSFileProviderEnumerator or a NSFileProviderReplicatedExtension. Under the surface, this is just a string.
var parentItemIdentifier: NSFileProviderItemIdentifier
Similarly to itemIdentifier, this property is a unique identifier that corresponds to the parent item (i.e. the folder containing the item in question).
var versionIdentifier: Data?
This property lets you keep track of which iteration of the target item you are dealing with. This is critical for letting you detect when things have changed remotely – you can compare whatever the remote version identifier with your locally-stored version identifier.
It’s also essential for conflict detection during modifications. The Data type allows flexibility; you could store an ETag, a revision hash, a timestamp, or any other opaque data that represents the item’s version according to your backend.
versionIdentifier and NSFileProviderItemVersionWhen it comes to version handling, you can choose to either employ this property or to rely on the NSFileProviderItemVersion value passed into the item modification and deletion methods of NSFileProviderReplicatedExtension. In practical terms they are very similar; though, versionIdentifier needs to be handled entirely by you (which may be better if your remote service already employs some sort of versioning identifier). With NSFileProviderItemVersion the system will give you content and metadata version data.
var contentType: UTType
This property describes the item’s type using Apple’s Uniform Type Identifier framework (UTType). This property is fundamentally important because it’s how you tell the OS whether an item is a folder (UTType.folder) or a file (e.g., UTType.plainText, UTType.jpeg, etc.).
Without correctly setting this, the system won’t know how to treat the item. As usual, the more specific you can be here (e.g., using UTType(filenameExtension: "…") for files), the better the integration with Quick Look, Spotlight, and app associations.
This property is not marked as required by the protocol, but you really should implement it for your extension to function correctly.
var capabilities: NSFileProviderItemCapabilities
NSFileProviderItemCapabilities is an OptionSet detailing to the OS what a user can potentially do with a given item based on permissions or service capabilities. This includes capabilities such as .allowsReading, .allowsWriting, .allowsRenaming, .allowsTrashing, .allowsDeleting, etc.
If you want users to be able to interact with files in any meaningful way (edit, rename, delete), you must implement this property and return the appropriate capabilities. For example, returning [.allowsReading, .allowsWriting, .allowsRenaming, .allowsTrashing] for a standard user-owned file. These capabilities influence which UI elements (like menu items) are enabled.
var fileSystemFlags: NSFileProviderFileSystemFlags
This property describes lower-level file system permissions or modes applicable to the item, as presented to the user or system. These include making a file read-only or read-writeable for users. fileSystemFlags can be seen as a subset of what might be possible based on capabilities and you probably want to make sure both properties permissions align.
var userInfo: [AnyHashable : Any]?
This optional dictionary is your escape hatch for storing custom metadata associated with an item that doesn’t fit into the standard properties. This can be useful for things like internal state flags, custom sharing info, etc.
The NSFileProviderEnumerating protocol
This protocol describes the one method that the system calls in order to create an NSFileProviderEnumerator.
This method is important as it provides you with the itemIdentifier of the container (folder) that the system wants you to list. You use this identifier to fetch the correct children from your backend or database.
Typically, you would implement this protocol in the File Provider Extension’s main class. Your implementation would create and return an instance of your custom enumerator class.
The NSFileProviderEnumerator protocol
An object conforming to the NSFileProviderEnumerator protocol does the actual work of listing items within a specific directory (itemIdentifier) provided via the NSFileProviderEnumerating method. It’s also responsible for reporting changes within that directory over time. The system calls methods on your enumerator instance when it needs to display folder contents (e.g., user navigates in Finder) or check for updates.
For each item identifier (directory) that needs enumeration, you might need a separate instance or configuration of your enumerator class.
Enumeration concepts
Containers
As you’d expect, folders are containers. When the system requests enumeration for a folder’s itemIdentifier, you provide NSFileProviderItem objects representing its sub-items (files and other folders).
Your enumerator implementation must also, however, specifically handle some special system containers. These containers have identifiers defined as constants on NSFileProviderItemIdentifier.
.rootContainer: the top-level, root directory of the File Provider domain..trashContainer: virtual container holding items the user has moved to the trash within your domain. Enumerating this should return items that are marked as trashed according to your service’s logic..workingSet: virtual container that represents the complete set of items that your extension knows about and should be available to the system, regardless of whether they have been downloaded or are currently visible in a specific folder. It is key for when you start notifying the system of remote changes.
Observers
An observer is an object provided by the system to your enumerator via the NSFileProviderEnumerator methods. Your enumerator uses this object to send results back to the system asynchronously.
There are two types of observers:
NSFileProviderEnumerationObserver: used when providing the initial list of items in a container (enumerateItems).NSFileProviderChangeObserver: used when reporting changes (creations, updates, deletions) since a previous point in time (enumerateChanges).
They work similarly: you call methods like didEnumerate(_:) or didUpdate(_:)/didDelete(_:) multiple times to report items/changes, followed by a final finishEnumerating(…) call to signal completion of that batch.
Pagination
Pagination is a mechanism used when enumerating the contents of a directory that has a large number of items. It allows your file provider extension to list the items in batches, rather than having to provide the entire list at once.
When the system calls enumerateItems(for:startingAt:), the startingAt parameter provides an NSFileProviderPage. Initially, this might be a special page like .initialPageSortedByDate or .initialPageSortedByName. Your enumerator fetches the corresponding batch of items (e.g., the first 50 items sorted by name).
You report these items by calling didEnumerate(_:) on the provided NSFileProviderEnumerationObserver. Once done with the current batch, you call finishEnumerating(upTo: nextPage:). Crucially, you provide your ownNSFileProviderPage object in the nextPage parameter. This object contains opaque data (defined by you, up to 500 bytes) that tells your enumerator where the next batch should start (e.g., an offset, a database cursor, the ID of the last item sent). The system will then call enumerateItems again, passing back the page you provided. When you’ve sent the last batch, you pass nil for nextPage.
If you don’t support pagination, you can return all items in one go and pass nil for nextPage immediately, but this is strongly discouraged for performance reasons.
The system provides a suggestedPageSize property on the observer, which indicates the optimal number of items to include in each page for better performance. You are advised to take this into account. The system enforces a maximum of 100 times the suggested size.
Your custom NSFileProviderPage data is limited to 500 bytes. Exceeding this will cause the enumeration to fail!
Sync anchors
A sync anchor (NSFileProviderSyncAnchor) is another piece of opaque Data, defined by you. It represents a specific point-in-time or state in your backend or local database. Think of it as a bookmark or cursor indicating “up to what point have changes been reported?”.
The system uses sync anchors primarily with the enumerateChanges(for:from:) method, especially for the .workingSet container. When the system wants to know about new remote changes (usually after you signal it), it calls enumerateChanges, passing the last sync anchor it received from you. Your enumerator uses this anchor to query your database/backend for all creations, modifications, and deletions that happened after that anchor’s point-in-time.
You report these changes using methods on the NSFileProviderChangeObserver (didUpdate, didDelete). Once you’ve reported a batch of changes, you call finishEnumeratingChanges(upTo: nextSyncAnchor: moreComing:). Here, you provide a new sync anchor representing the state after the changes you just reported. The system stores this new anchor. If you set moreComing: true, the system might immediately call enumerateChanges again with the anchor you just provided to get the next batch. If false, enumeration stops until signalled again.
For the special .workingSet enumerator, the system relies heavily on this anchor mechanism to efficiently learn about all remote changes across the entire domain since the last sync point.
Enumerator methods
The system expects enumerateItems and enumerateChanges to report items/changes relatively quickly (within a few seconds per page/batch). If network latency is high, report readily available items first or potentially fail the enumeration for that page with an appropriate error (like .serverUnreachable) rather than blocking indefinitely.
func enumerateItems(for: any NSFileProviderEnumerationObserver, startingAt: NSFileProviderPage)
This method is called by the system to get the initial list of contents for a specific container (itemIdentifier used to create the enumerator). This typically happens when a user first navigates into a folder in Finder/Files.
Your implementation should:
- Identify the container from the
itemIdentifierthe enumerator was initialized with. - Use the
startingAtpage information to query your backend/database for the correct batch of child items. - For each child item, create an
NSFileProviderItemobject representing it. - Report each item to the
observerusingobserver.didEnumerate([item]). - Once the batch is complete, determine the
NSFileProviderPagefor the next batch (if any). - Call
observer.finishEnumerating(upTo: nextPage)with the next page ornilif done.
func enumerateChanges(for: any NSFileProviderChangeObserver, from: NSFileProviderSyncAnchor)
This method is called to report changes (creations, updates, deletions) within the container since the state represented by the from sync anchor. This is the core mechanism for keeping the system’s view synchronised with remote changes, especially for the .workingSet container. It’s usually triggered after you inform the system that changes have happened for this container.
Your implementation should:
- Identify the container.
- Use the
fromsync anchor to query your backend/database for all items within this container that have been created, modified, or deleted since that anchor’s point-in-time. - For updated/created items, report them using
observer.didUpdate([item]). - For deleted items, report their identifiers using
observer.didDelete([itemID]). - Determine the new sync anchor representing the state after these reported changes.
- Decide if there are potentially more changes to report immediately (
moreComing: true) or if this batch covers everything up to the new anchor (moreComing: false). - Call
observer.finishEnumeratingChanges(upTo: newSyncAnchor, moreComing: moreComing).
func currentSyncAnchor(completionHandler: (NSFileProviderSyncAnchor?) -> Void)
The system often calls this before calling enumerateChanges to get the most recent sync anchor your enumerator knows about for the container. This helps it start the change enumeration from the correct point.
Your implementation should:
- Determine the latest sync anchor that represents the current state of reported changes for this container (likely stored in your database or derived from the last reported state).
- Create an
NSFileProviderSyncAnchorcontaining this data. - Call the
completionHandlerwith the anchor.
The main class of your File Provider Extension
The main class within your File Provider Extension target must conform to NSFileProviderReplicatedExtension. This protocol defines the core methods the system calls to interact with individual items.
The File Provider API still often relies on old-fashioned completion handlers rather than async/await. This includes the core methods of NSFileProviderReplicatedExtension. If you use a lot of async/await in your application’s codebase I recommend you look into Tasks as these will help you merge these two approaches.
Initialisation and invalidation methods
init(domain: NSFileProviderDomain)
The initializer for your extension class. The system provides the NSFileProviderDomain this instance will manage. You should use the domain.identifier to load the correct configuration, database, or user session for this specific domain/account. Perform necessary setup here.
func invalidate()
The system calls this just before terminating your extension process (e.g., if the domain is removed, the system is shutting down, or the process has been idle). Use this for any final cleanup, like saving state or closing database connections gracefully.
Item-related methods
The following methods handle operations on specific items, identified by NSFileProviderItemIdentifier. Most of them require you to return a Progress object immediately and call a completionHandler asynchronously when the operation finishes. A well behaved File Provider extension should handle Progress appropriately.
func item(for: NSFileProviderItemIdentifier, request: NSFileProviderRequest, completionHandler: (NSFileProviderItem?, (any Error)?) -> Void) -> Progress
Called when the system needs the latest metadata for an item it already knows about (i.e., one that has been previously enumerated). It might call this before attempting to fetch contents or display properties.
Your implementation should:
- Look up the item corresponding to the
identifierin your local database/cache. - Optionally, you could fetch fresh metadata from your remote server if needed, but ideally, rely on your cached state updated via change enumeration.
- Create an
NSFileProviderItemobject representing the item’s current metadata. - Call the
completionHandlerwith the item or an error (e.g.,.noSuchItemif it’s unexpectedly missing). - Return an empty
Progressobject (as this is usually expected to be fast).
The system will only call this method for items it already knows about – i.e. files or folders that have already been enumerated.
func fetchContents(for: NSFileProviderItemIdentifier, version: NSFileProviderItemVersion?, request: NSFileProviderRequest, completionHandler: (URL?, NSFileProviderItem?, (any Error)?) -> Void) -> Progress
This is the core method for downloading file content (materialization). The system calls this when a user tries to open a file that isn’t fully downloaded, or an application requests its content.
Your implementation must:
- Identify the item using
itemIdentifier. - Initiate a download of the item’s content from your remote server.
- Crucially, download the content to a temporary location that you manage. Don’t write directly into the
~/Library/CloudStoragelocation. - Update the returned
Progressobject as the download progresses (totalUnitCount,completedUnitCount). - Once the download is complete and the content is saved to the temporary file:
- Update the item’s metadata in your database (e.g., set
isDownloaded = true, updateversionIdentifier). - Create an updated
NSFileProviderItemreflecting this new state. - Call the
completionHandlerwith theURLof the temporary file containing the downloaded content, the updatedNSFileProviderItem, andnilfor the error. - If an error occurs (network issue, item not found remotely), call the
completionHandlerwithnil,nil, and the appropriateError(e.g.,.serverUnreachable,.noSuchItem).
- Update the item’s metadata in your database (e.g., set
- Return the
Progressobject immediately when the method is called.
After receiving the fileContents, the system clones and deletes the file. Don’t mutate the corresponding file after calling the completion handler. If your extension needs to keep a copy of the content, create a clone of the content and pass the URL of the clone as the completion handler’s fileContents parameter.
Disallowing downloads
You can control which processes can request files. By default, the system automatically manages files based on its POSIX access control lists.
To prevent a process from accessing content from the extension’s domain, save an array of strings to the NSFileProviderExtensionNonMaterializingProcessNames UserDefaults key. The system won’t fetch content if the requesting process’s name matches a string in this array.
- In macOS 11.0 and later, the system checks this list when a process reads a file using POSIX filesystem calls.
- In macOS 11.4 and later, the system also checks this list when a process reads a file using file coordination.
Incremental and partial content fetching
The File Provider API offers optional protocols to make downloads more efficient, especially for updates or large files. Implementing these in your main extension class (alongside NSFileProviderReplicatedExtension) can significantly improve performance.
NSFileProviderIncrementalContentFetching
This protocol allows you to optimise file updates. If your extension conforms, the system may call fetchContents(for:version:usingExistingContentsAt:existingVersion:request:completionHandler:)instead of the basic fetchContents.
The system provides the URL (usingExistingContentsAt) and version (existingVersion) of the content it already has cached locally. Your implementation should ideally download only the differences (a delta) between the existingVersion and the requestedVersion from your server, apply those changes to the provided local content, and return the updated file via the completion handler.
If you don’t implement this, the system falls back to downloading the entire file for every update via the basic fetchContents.
NSFileProviderPartialContentFetching (macOS 12.3+)
This protocol enables fetching only specific byte ranges of a file, which is invaluable for large media files, databases, or accessing metadata without downloading the whole item.
If implemented, the system can call fetchPartialContents(for:version:request:minimalRange:aligningTo:options:completionHandler:), specifying the minimalRange (as an NSRange) it needs.
Your implementation must fetch at least this requested range from your remote storage, respecting byte alignment requirements specified by the system (the start and end of the range of data you provide must be multiples of this value). You provide the downloaded data range in a temporary file via the completion handler, as well as the retrievedRange of continuous bytes (again, respecting alignment — up to the end of the file). The options parameter might include .strictVersioning, requiring specific version handling.
Partial fetching is typically only triggered when an application reads the file using low-level POSIX read() operations for specific ranges. Standard file copying or reading via NSFileCoordinator usually results in a full file download via the basic WorkspaceContents.
This method can be called concurrently, including on different parts of the same file. You can control concurrent requests by setting the NSExtensionFileProviderDownloadPipelineDepth key in your extension’s Info.plist file. Set the value to the number of concurrent downloads the system can create per domain. This value must be between 1 and 128.
func createItem(basedOn: NSFileProviderItem, fields: NSFileProviderItemFields, contents: URL?, options: NSFileProviderCreateItemOptions, request: NSFileProviderRequest, completionHandler: (NSFileProviderItem?, NSFileProviderItemFields, Bool, (any Error)?) -> Void) -> Progress
Called when a user creates a new file or folder locally within your domain. Your job is to propagate this creation to your remote storage.
Key parameters:
itemTemplate: Contains the desired properties for the new item (likefilename,contentType,parentItemIdentifier).fields: Specifies which fields in theitemTemplateare actually being set by this creation request.contents url: For files, this provides a temporaryURLwhere the initial content resides. This URL is nil for folders.options: Contains flags like.mayAlreadyExist.
Your implementation should:
- Determine the target parent directory from
itemTemplate.parentItemIdentifier. - Determine the desired filename from
itemTemplate.filename. - Initiate an upload operation to your remote server:
- For folders, create the folder remotely.
- For files, upload the content from the
contents url.
- Update the returned
Progressobject during the upload. - Once the upload is complete and the item exists remotely:
- Get the final metadata of the newly created item from the server (including its new unique remote ID and version).
- Store this new item in your local database.
- Create an
NSFileProviderItemrepresenting the final state of the created item. - Call the
completionHandler: - Provide the finalNSFileProviderItem. - Provide[]for the fields parameter (assuming all requested fields were applied). - Providefalsefor the boolean (usually no need to immediately re-download after upload). - Providenilfor the error. - If an error occurs (e.g., collision, quota exceeded, network error), call the completion handler with
nil, [], false, error. Use specific errors like.filenameCollisionor.insufficientQuotawhere applicable.
- Return the
Progressobject immediately.
The file provided at the url is owned by the system and is unlinked after the completion handler is called. If your extension needs to keep a copy, it must clone the file.
func modifyItem(NSFileProviderItem, baseVersion: NSFileProviderItemVersion, changedFields: NSFileProviderItemFields, contents: URL?, options: NSFileProviderModifyItemOptions, request: NSFileProviderRequest, completionHandler: (NSFileProviderItem?, NSFileProviderItemFields, Bool, (any Error)?) -> Void) -> Progress
Called when a user modifies an existing item locally. This covers metadata changes (rename, move/reparent, etc.) and content changes.
Key parameters:
item: TheNSFileProviderItemrepresenting the desired state after modification. Check itsitemIdentifier,filename,parentItemIdentifier, etc.baseVersion: The system’s idea of the item’s version before this modification occurred. Crucial for conflict detection.changedFields: Indicates which metadata properties have changed (e.g.,.filename,.parentItemIdentifier).contents newContents: If the file’s content changed, thisURLpoints to the temporary file holding the new data (similar tocreateItem). Nil if only metadata changed.options: Flags like.mayAlreadyExist(relevant for renames/moves).
Your implementation should:
- Identify the item using
item.itemIdentifier. - Conflict Detection: Compare the
baseVersionprovided by the system with the current version you know for this item (e.g., from your database usingversionIdentifier). If they don’t match, a conflict has occurred (see Conflicting changes). Handle this before proceeding. - If no conflict, determine the necessary remote operation(s):
- If
changedFieldsincludes.filename, perform a remote rename. - If
changedFieldsincludes.parentItemIdentifier, perform a remote move. Check if the new parent is.trashContainerto handle trashing. - If
newContentsis not nil, upload the new content from the URL to the remote server.
- If
- Update the
Progressobject during remote operations. - Once remote operations are complete:
- Get the final metadata of the modified item from the server (especially its new version).
- Update the item in your local database.
- Create an
NSFileProviderItemfor the final state. - Call the
completionHandlersimilarly tocreateItem(finalItem, [], false, nilon success, ornil, [], false, erroron failure). Use appropriate errors like.filenameCollisionif a rename/move results in one.
- Return the
Progressobject immediately.
Moving an item to the trash is typically handled here. You’ll detect that changedFields contains .parentItemIdentifier and that the new item.parentItemIdentifier is NSFileProviderItemIdentifier.trashContainer. Your remote operation should mark the item as trashed according to your service’s logic. You don’t usually delete it permanently yet.
If your service doesn’t support trashing, check for this case and return NSFileProviderError(.featureUnsupported) in the completion handler. Ensure your item’s capabilities also don’t include .allowsTrashing.
func deleteItem(identifier: NSFileProviderItemIdentifier, baseVersion: NSFileProviderItemVersion, options: NSFileProviderDeleteItemOptions, request: NSFileProviderRequest, completionHandler: ((any Error)?) -> Void) -> Progress
Called when an item needs to be permanently deleted. This typically happens when a user empties the trash or deletes directly if trashing isn’t supported/enabled.
Key parameters:
identifier: The ID of the item to delete.baseVersion: The system’s known version before deletion. Use for conflict checks if necessary (though less common for delete).options: May include.recursiveif deleting a non-empty folder is allowed.
Your implementation should:
- Identify the item using
identifier. - Perform checks:
- If deleting a folder, check if it’s empty remotely. If it’s not empty and
optionsdoes not contain.recursive, fail withNSFileProviderError(.directoryNotEmpty). - Optionally perform conflict checks using
baseVersion.
- If deleting a folder, check if it’s empty remotely. If it’s not empty and
- Initiate the permanent deletion of the item on your remote server.
- Update the
Progressobject. - Once remote deletion is confirmed: a. Remove the item from your local database. b. Call the
completionHandlerwithnilfor the error. c. If deletion fails remotely or is rejected (e.g., permissions, non-empty directory), call thecompletionHandlerwith the appropriateError(e.g.,.directoryNotEmpty,.deletionRejected). - Return the
Progressobject immediately.
If the system asks to delete an identifier that you no longer recognise (perhaps it was already deleted remotely and cleaned up via change enumeration), it’s generally safe to just call the completionHandler with nil error.
You can actively prevent a deletion requested by the system (if your logic requires it) by calling the completion handler with NSFileProviderError(.deletionRejected). This tells the system the deletion failed and it should effectively “undelete” or restore the item locally based on the latest metadata it can fetch from your extension.
Handling Progress
Many NSFileProviderReplicatedExtension methods expect you to return a Progress object immediately, even though the actual work (like uploading or downloading) happens asynchronously. Correctly updating this Progress object is essential for providing visual feedback to the user (e.g., progress pies in Finder).
The basic idea is:
- Create a
Progressobject in the main method. - Set its
totalUnitCount(e.g., file size in bytes for downloads). - Return the
Progressobject. - In your asynchronous task (e.g.,
URLSessiondelegate methods), update thecompletedUnitCountof that sameProgressobject. You might also useProgress.addChild(_:withPendingUnitCount:)to link network task progress directly.
class FileProviderExtension:
    NSObject, NSFileProviderReplicatedExtension, NSFileProviderEnumerating
{

    ...

    func fetchContents(
        for itemIdentifier: NSFileProviderItemIdentifier,
        version requestedVersion: NSFileProviderItemVersion?,
        request: NSFileProviderRequest,
        completionHandler: @escaping (URL?, NSFileProviderItem?, Error?) -> Void)
    -> Progress {
        let progress = Progress()
        // Item.storedItem(identifier:) retrieves the item from the database
        guard let item = Item.storedItem(identifier: itemIdentifier) else {
            completionHandler(nil, nil, NSFileProviderError(.noSuchItem))
            return progress
        }

        Task {
            let (url, error) = await item.fetchContents(domain: domain, progress: progress)
            completionHandler(url, item, error)
        }
        return progress
    }
}

class Item: NSObject, NSFileProviderItem {

    ...

    func fetchContents(progress: Progress) async -> (URL?, Error?) {
        // This is actually a computed property, but do something to this effect
        self.isDownloading = true

        let localUrl = FileManager
            .default
	        .temporaryDirectory
	        .appendingPathComponent("\(self.filename).tmp")
        let error = await remoteInterface.download(
            remoteUrl: self.remoteUrl, localUrl: localUrl, progress: progress
        )

        // Again, these are computed properties, but do something to this effect
        self.isDownloading = false
        self.isDownloading = true

        return (localUrl, fpItem, nil)
    }
}

class DownloadDelegate: NSObject, URLSessionTaskDelegate {
    private let progress: Progress

    init(progress: Progress) {
        self.progress = progress
    }

    func urlSession(_ session: URLSession, didCreateTask task: URLSessionTask) {
        progress.addChild(task.progress, withPendingUnitCount: 100)
    }
}

class RemoteInterface {

    ...

    func download(remoteUrl: URL, localUrl: URL, progress: Progress ) async -> Error? {
        let delegate = DownloadDelegate(progress: progress)
        let request = URLRequest(url: remoteUrl)

        do {
            let (tempUrl, _) = try await URLSession.shared.download(for: request, delegate: delegate)
            try FileManager.default.moveItem(at: tempUrl, to: localUrl)
            return nil
        } catch {
            return error
        }
    }
}
The system expects metadata-related methods to complete their completionHandler relatively quickly. If these take too long, the operation might fail.
For content-related operations, the system is more lenient regarding time but relies on the Progress object. If an operation stalls (progress stops updating for too long) or if the user cancels the operation (e.g., clicking the ‘x’ on the progress pie), the system may call the cancel() method on the Progress object you returned.
Your code should ideally observe this cancellation (progress.isCancelled or using progress.cancellationHandler) and abort the ongoing network operation. You should then call the completionHandlerwith an appropriate error, often NSCocoaError(.userCancelled). If network conditions are poor and downloads/uploads are expected to be very slow, consider proactively failing with .serverUnreachable instead of potentially hitting system timeouts.
Pending items
“Pending items” refers to files or folders that have registered changes, but those changes have not yet been fully synchronized by the File Provider extension. This includes scenarios like local modifications awaiting upload to the server, or items marked as remotely changed (via the working set) whose updates haven’t been applied locally yet (e.g., downloaded).
The system provides mechanisms to track when this set of pending items changes, specifically by calling a pendingItemsDidChange(completionHandler:) method and posting an NSFileProviderPendingSetDidChange notification. You can access the current list of these items by obtaining an enumerator via the enumeratorForPendingItems() method, which adheres to the NSFileProviderPendingSetEnumerator protocol.
For an item to be listed by this pending enumerator, it must meet specific conditions:
- A change must have been observed by the system (either locally or signaled remotely)
- This change must have occurred more than one second ago
- The File Provider extension must not have yet completed the synchronization process for that change.
Items might remain in this pending state for various reasons, such as the system being under heavy load delaying event processing, ongoing long-running operations like large uploads or downloads for the item, or errors encountered during previous sync attempts for that item.
Importantly, the pending set has limitations. It only includes items already known to the File Provider extension (not brand new ones mid-initial-upload) and only those whose synchronization remains queued for longer than a system-defined refresh interval (which is longer than the one-second threshold). Therefore, a newly created local file undergoing its initial upload, even if it takes several minutes, will typically not appear in the pending set. The set is more indicative of items whose sync status is delayed or potentially problematic.
Adding your first File Provider domain
Creating a File Provider domain from your main application is fairly straightforward using NSFileProviderManager:
let domainIdentifier = NSFileProviderDomain("my-domain")
let domainDisplayName = "My Domain"
let domain = NSFileProviderDomain(identifier: domainIdentifier, displayName: domainDisplayName)
do {
	try await NSFileProviderManager.add(domain)
} catch let error {
	print("Could not create domain for \(domain.rawIdentifier): \(error)")
}
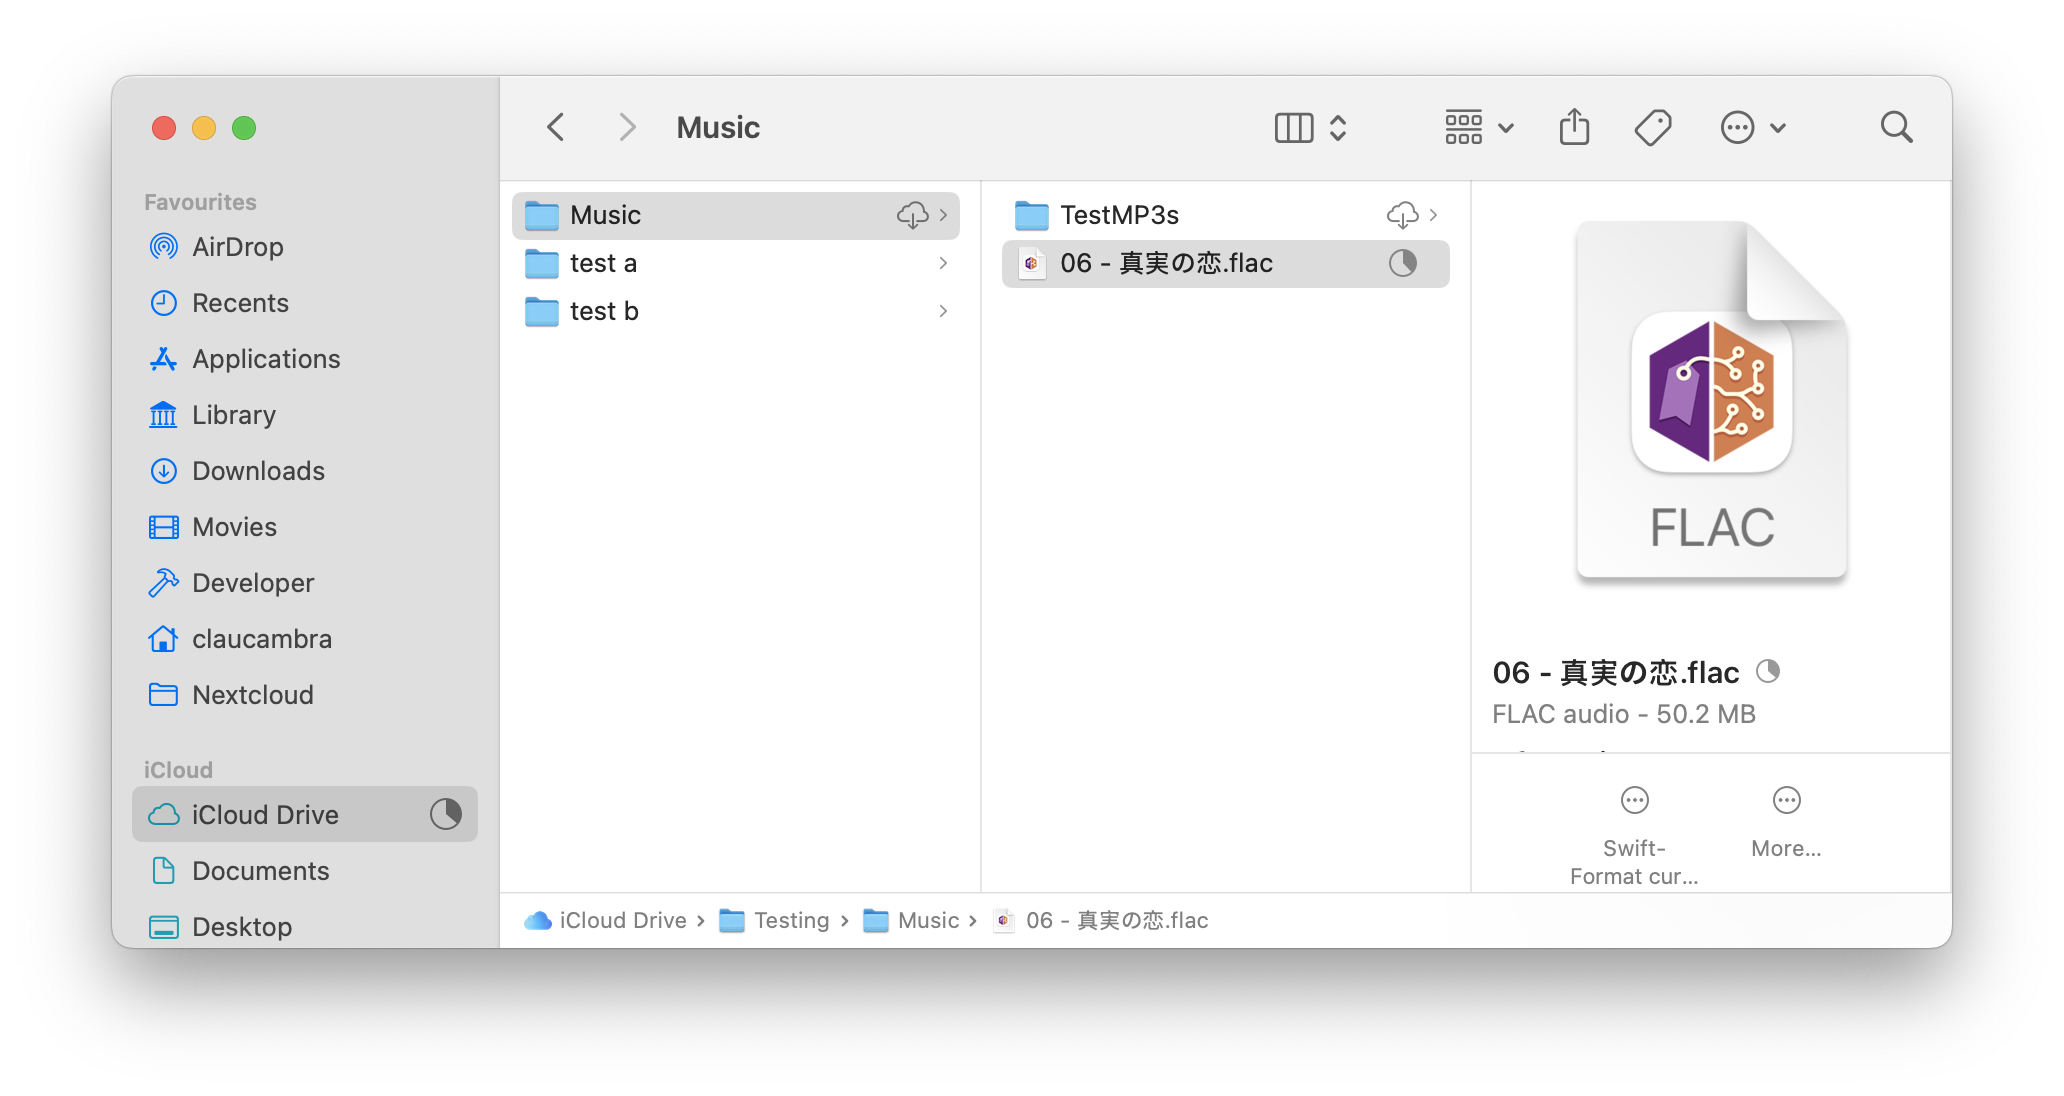
If successful, this will create a new entry under Finder’s sidebar’s “Locations” entry. Your new File Provider domain should also be accessible under ~/Library/CloudStorage/. Your domain’s storage will also be accessible via a path like ~/Library/CloudStorage/YourApp-YourDomainDisplayName. Accessing these locations will trigger macOS to launch your File Provider Extension process and start calling its methods.
Informing the system of remote changes
Your File Provider Extension generally knows about local changes immediately because the system calls methods like modifyItem. But how does the system learn about changes that happen remotely? What if another user uploads a file, or a file is changed via a web interface?
Your application needs a mechanism to detect these remote changes — polling the server, receiving push notifications, using a web-socket, etc. Once your app detects remote changes relevant to a specific domain, it must signal the system. This can be done by the main app or potentially the extension itself, if it runs background tasks.
Signalling the system is done by calling signalEnumerator(for: completionHandler:) on the NSFileProviderManager instance associated with the domain where changes occurred.
func signalRemoteChangesDetected(
	for domainIdentifier: NSFileProviderDomainIdentifier
) async {
    guard let manager = NSFileProviderManager(for: domainIdentifier) else {
        print("Could not get manager for domain \(domainIdentifier.rawValue)")
        return
    }

    do {
        try await manager.signalEnumerator(for: .workingSet)
        print("Successfully signalled working set enumerator")
    } catch let error {
        print("Error signaling enumerator: \(error)")
    }
}
When signalling changes this way, you should almost always pass NSFileProviderItemIdentifier.workingSet as the containerIdentifier. The system relies on the working set enumerator to learn about all changes across the entire domain since the last sync anchor. Signalling specific folders is generally ignored for this purpose.
Calling signalEnumerator prompts the system to eventually call your extension’s enumerator(for: .workingSet, …) method, followed by currentSyncAnchor(…) and then enumerateChanges(for: from: …) on the resulting working set enumerator, passing the last known sync anchor. Your change enumeration logic then reports all the new remote changes to the system.
Apple also provides PushKit for receiving background push notifications directly targeted at your File Provider Extension. This can be more efficient if you are polling the server from your main app, as it allows the server to notify your extension immediately when changes occur. I haven’t personally used this approach extensively (web sockets fulfil a similar role), but you can read the documentation on Using Push Notifications to Signal Changes.
Handling sync issues and edge cases
Sync systems are complex, and the File Provider API requires you to handle various error conditions and conflicts gracefully.
Error types
Returning the correct NSFileProviderError code from your extension methods is important. The specific error code directly influences how the system reacts – whether it retries automatically, waits for you to signal resolution, presents specific UI, or attempts recovery actions.
Resolvable errors
A limited set of NSFileProviderErrors can be resolved directly by you as conditions change. When they occur, the system presents an appropriate alert to the user and then throttles or backs off from retrying the failed operation. This state continues until the application or extension explicitly calls signalErrorResolved(:completionHandler:). This signals to the system that the condition causing the error has been addressed.
NSFileProviderError.notAuthenticated
Report this error if a procedure cannot be completed because the user is not authenticated. When encountering this resolvable error, the system presents an appropriate alert and throttles the operation until the app or extension calls signalErrorResolved(:completionHandler:).
The system automatically presents the UI extension’s principal view controller for this error. You should ideally provide an interface for the user to resolve the issue, possibly guiding them through logging in, and then call signalErrorResolved.
Reporting this error will trigger the appearance of a small ribbon under Finder’s toolbar stating that the user needs to authenticate. This ribbon will also contain a “Sign in” button that will trigger the appearance of a modal window. Properly handling this requires the creation of a File Provider UI Extension.
NSFileProviderError.serverUnreachable
Report this error when you cannot contact your backend server. The system waits for the next explicit signal (either signalErrorResolved called by your app once connectivity is restored, or a regular signalEnumerator for other changes). Often used for network timeouts during uploads/downloads or slow enumeration.
NSFileProviderError.insufficientQuota
Report this error when the user is out of storage space on the server. Your app should inform the user and call signalErrorResolved if the situation changes (e.g., user upgrades plan or deletes other files).
NSFileProviderError.cannotSynchronize
Report this as generic error indicating a sync issue related to the account or system state prevents the operation.
NSFileProviderError.noSuchItem
If the item requested by the system does not exist in the provider, the extension should fail the call with this error. If a download fails because the item was deleted or is unknown on the server, fail the call with this error. If the extension doesn’t recognise the item during item(for:request:completionHandler:) or fetchContents(for:version:request:completionHandler:), pass this error. If creation fails because the target directory doesn’t exist, pass this error to the handler.
In these cases, the system considers the item removed and attempts deletion from disk. If deletion fails due to local changes, the system re-creates the item. It can also be used if the contents of a bundle or package cannot be enumerated.
You should use NSError.fileProviderErrorForNonExistentItem(withIdentifier itemIdentifier: NSFileProviderItemIdentifier) to create this error, otherwise the system will not handle this as expected!
Transient errors
These errors usually indicate temporary issues or situations the system might be able to resolve automatically by retrying the operation, possibly after taking some action. You generally don’t need to call signalErrorResolvedfor these.
NSFileProviderError.filenameCollision
In case of a path collision with an already existing item during creation or modification, the provider can reject the operation with this error. The system is responsible for resolving the collision by renaming one of the items, and will then call the relevant method (e.g. modifyItem) again.
You should use NSError.fileProviderErrorForCollision(with existingItem: NSFileProviderItem) to create this error, otherwise the system will not handle this as expected!
NSFileProviderError.syncAnchorExpired
If the system queries the working set enumerator with a sync anchor that is aged out, the enumerator should report this error so the system restarts the sync operation from the beginning.
NSFileProviderError.pageExpired
If the system queries a given page for enumeration with an “outdated page token”, this error will make the system re-start enumeration from scratch.
The documentation is coy about what constitutes an “outdated page token”. I have understood this to mean that you are able to implement some structured data (e.g. JSON) in your NSFileProviderPage data where you can store some sort of version data, which you can then use to check if, during enumeration, the target container has changed remotely, allowing you to inform the system of this.
NSFileProviderError.deletionRejected
If the provider wishes to prevent the deletion of an item, it should fail the delete call with this error. This causes the system to re-create the item on disk based on the latest metadata from the extension.
You should use NSError.fileProviderErrorForRejectedDeletion(of updatedVersion: NSFileProviderItem) to create this error, otherwise the system will not handle this as expected!
NSFileProviderError.directoryNotEmpty
If the delete options do not include recursive deletion and the target is a non-empty directory, or if children cannot be deleted, reject the deletion with this error.
NSFileProviderError.excludedFromSync
If you wish to exclude an item from sync (macOS 11.3+), return this error. It can also be reported if creation or modification cannot be applied due to the current state of the system or domain.
NSFileProviderError.versionNoLongerAvailable
Available from macOS 12.3; indicates a requested item version is permanently unavailable. If you have implemented partial fetching for files, it can be returned by your provider’s fetchPartialContentsForItemWithIdentifier implementation specifically when NSFileProviderFetchContentsOptionsStrictVersioning is specified in the options, signifying that a remote update has invalidated the requested version.
System errors
The following errors will be returned by the system if things happen to go horribly wrong.
static var providerNotFound: NSFileProviderError.Codestatic var providerTranslocated: NSFileProviderError.Codestatic var olderExtensionVersionRunning: NSFileProviderError.Codestatic var newerExtensionVersionFound: NSFileProviderError.Codestatic var applicationExtensionNotFound: NSFileProviderError.Codestatic var providerDomainNotFound: NSFileProviderError.Codestatic var providerDomainTemporarilyUnavailable: NSFileProviderError.Code
NSFileProviderManager Errors
These errors are provided by NSFileProviderManager when interacting with files managed by a File Provider extension.
static var nonEvictable: NSFileProviderError.Codestatic var nonEvictableChildren: NSFileProviderError.Codestatic var unsyncedEdits: NSFileProviderError.Code(when you try to evict an item with edits that are still pending upload)
This error is not clearly documented, but I am assuming it also belongs in this category:
Excluded files
Items can be excluded from sync by providing the completionHandler with the aforementioned NSFileProviderError.excludedFromSync during creation or modification. You will still need to be aware of this item in your database when the system asks you to retrieve it via its identifier or to modify it (you can still choose to return this error when completing local metadata modifications).
Filename collisions
For item creation and modification, providing the completionHandler with NSFileProviderError.filenameCollision will make the system retry the operation with a new filename.
Unfortunately, enumeration is a different story. If your change enumeration discovers a new remote file whose name conflicts with an existing local file (or another new remote file), the File Provider API doesn’t offer a direct system-managed resolution during enumeration. You have a few strategie:
- Rename remotely: before reporting the change via
didUpdate, attempt to rename the new conflicting file on the server. This avoids the local conflict. - Enumerate with modified name: Report the new item via
didUpdatebut give it a modifiedfilename(e.g., “file (server copy).txt”). Store the original remote name in your database. This makes the file available locally but requires user intervention (renaming one of the files) to resolve the underlying name conflict properly. The system’s collision handling won’t trigger here. - Skip enumeration: Don’t report the conflicting new item via
didUpdateat all, effectively hiding it from the user until the conflict is resolved elsewhere (e.g., user renames the existing local file, or the conflicting remote file is renamed).
Conflicting changes
You may run into the following situation:
- A user modifies a file locally (creating unsynced local changes).
- Before those local changes are uploaded, the file is also modified remotely (e.g., by another user or on another device).
- Your extension attempts to upload the local changes via
modifyItem.
This is a sync conflict, and failing to handle this will result in data loss.
When handling modifyItem, you should acquire the target item’s version (either via the versionIdentifier property or via the baseVersion argument of modifyItem, depending on your approach) before handling modifications. You should then compare this to the version information on the remote server.
If the versions do not match, you should create a new, distinct remote copy of the local modified target item during the modification process and show the user this is a conflict item (ideally via the filename, e.g. (Conflict copy)). You can then trigger a change enumeration by calling signalEnumerator(for: completionHandler:) on the NSFileProviderManager instance associated with your file provider’s domain. This will lead to a safe resolution: you will keep a conflict copy, and the version of the file with remote changes will be pulled into a new copy of the original file when changes are enumerated. The user can then manually merge or choose which version to keep.
Files, folders… and bundles
File and folder-type items are handled relatively sensibly throughout the File Provider API. You can expect to receive create item requests for folders that are content-less for folders, with each child item receiving its own create item request. Similarly, modify item requests on folders will only affect metadata, with child item changes (or new create item requests) being subject to their own requests.
Bundles, unfortunately, are not treated like this. Practically speaking, they will be passed through to your fetch contents, create, modify, and delete item methods as if they were files. Under the surface, though, they are actually folders. That means when createItem or modifyItem provides a contents url pointing to a bundle, your extension code needs to:
- Access the directory at the provided
contents url. - Manually iterate through its internal files and subdirectories.
- Replicate this structure and content onto your remote server, potentially uploading multiple individual files and subfolders (which themselves need to be handled this way, recursively)
Similarly, when a bundle is modified locally, modifyItem will just give you the top-level bundle item and the contents url. Your code might need to compare the contents at the URL with the previous state (if cached) to figure out which internal files actually changed, or simply re-upload the entire bundle structure if granular detection is too complex.
Existing Finder Sync extensions
macOS assumes that a File Provider Extension is intended to replace a Finder Sync Extension if both originate from the same app bundle. When the system detects a non-hidden domain from such a File Provider Extension, it automatically transfers the user’s opt-in status from the Finder Sync Extension to the File Provider domains. This means your Finder Sync Extension will not be executed by the system.
It seems to be possible to circumvent this automatic replacement behaviour and allow both extensions to operate simultaneously by isolating the Finder Sync Extension within a separate helper application, which is then bundled with the main app and executed alongside it.
Communicating with the File Provider Extension from external processes
Your main application, and other of your application’s app extensions, can request a direct XPC service connection with the running File Provider Extension process for a specific domain. This direct interaction method is particularly useful for handling custom actions or queries.
Your file provider extension can expose custom services by implementing the NSFileProviderServicing protocol. These services provide custom communication channels to client applications. Client applications (including your main app) can retrieve a list of these supported custom services by calling FileManager.default.fileProviderServicesForItem(at: url) for a specific item URL. Specifically:
- In your File Provider Extension:
- Define a protocol (
@objc) detailing the methods your service will expose (e.g.,CustomCommunicationProtocol). - Create a class that implements
NSObject,NSFileProviderServiceSource, and your custom protocol. This class acts as the XPC service object. ImplementmakeListenerEndpoint()to return an anonymous listener’s endpoint. - Implement the
NSXPCListenerDelegatemethodlistener(_:shouldAcceptNewConnection:)to configure and resume new connections, setting the exported interface and object. - Make your main
FileProviderExtensionclass conform toNSFileProviderServicing. - Implement
supportedServiceSources(for:completionHandler:)in your main extension class. Return an array containing an instance of your service source class.
- Define a protocol (
- In your Main App / Other Extension (Client):
- Get the URL of an item within the target File Provider domain.
- Call
FileManager.default.fileProviderServicesForItem(at: url)to get a dictionary of available services. - Look up your service using its name (e.g.,
services["com.claucambra.fpExample.CustomService"]). - Get an
NSXPCConnectionusingservice.getFileProviderConnection(). - Configure the connection’s
remoteObjectInterfaceto expect your custom protocol. - Set interruption/invalidation handlers.
- Resume the connection.
- Get the
remoteObjectProxyand cast it to your custom protocol type. - Call methods defined in your protocol on the proxy object.
/// In your File Provider Extension

protocol CustomCommunicationProtocol {
	func print(_ string: String)
}

class CustomCommunicationService: NSObject, NSFileProviderServiceSource, NSXPCListenerDelegate, CustomCommunicationProtocol {

    let listener = NSXPCListener.anonymous()
    let serviceName = NSFileProviderServiceName("com.claucambra.fpExample.CustomCommunicationService")

    func makeListenerEndpoint() throws -> NSXPCListenerEndpoint {
        listener.delegate = self
        listener.resume()
        return listener.endpoint
    }

    func listener(_ listener: NSXPCListener, shouldAcceptNewConnection newConnection: NSXPCConnection) -> Bool {
        newConnection.exportedInterface = NSXPCInterface(with: CustomCommunicationProtocol.self)
        newConnection.exportedObject = self
        newConnection.resume()
        return true
    }

    //MARK: - Custom Communication Protocol methods
    func print(_ string: String) {
		print(string)
    }
}

extension FileProviderExtension: NSFileProviderServicing {

    func supportedServiceSources(
        for itemIdentifier: NSFileProviderItemIdentifier,
        completionHandler: @escaping ([NSFileProviderServiceSource]?, Error?) -> Void
    ) -> Progress {
        let services: [NSFileProviderServiceSource] = [CustomCommunicationService()]
        completionHandler(services, nil)
        let progress = Progress()
        progress.cancellationHandler = {
            let error = NSError(domain: NSCocoaErrorDomain, code: NSUserCancelledError)
            completionHandler(nil, error)
        }
        return progress
    }
}
/// In your main application / File Provider UI extension / etc.

enum FileProviderCommunicationError: Error {
    case serviceNotFound
    case remoteProxyObjectInvalid
}

func acquireServiceConnection(
    url: URL, interruptionHandler: @escaping () -> Void
) async throws -> CustomCommunicationService {

    let services = try await FileManager().fileProviderServicesForItem(at: url)
    guard let service = services["com.claucambra.fpExample.CustomCommunicationService"] else {
        throw FileProviderCommunicationError.serviceNotFound
    }

    let connection: NSXPCConnection
    connection = try await service.fileProviderConnection()
    connection.remoteObjectInterface = NSXPCInterface(with: CustomCommunicationService.self)
    connection.interruptionHandler = interruptionHandler
    connection.resume()

    guard let proxy = connection.remoteObjectProxy as? CustomCommunicationService else {
        throw FileProviderCommunicationError.remoteProxyObjectInvalid
    }
    return proxy
}

func printThroughFileProviderExtensionProcess() async {
	 do {
		let connection = try await serviceConnection(url: itemURL, interruptionHandler: {
			print("Service connection interrupted")
		})
		await connection.print("Hello from the other siiiiiiiiiide..")
	} catch let error {
		print("Could not print remotely, received error:\(error)")
	}
}
Communicating with external processes from the File Provider Extension
As long as an external process initiates the XPC exchange described in the previous section, Apple’s provided approach works great. Unfortunately, there may be situations in which you’d like the File Provider Extension to be the one to reach out to external processes such as your main application.
Two potential solutions:
DistributedNotificationCenter: your File Provider Extension can broadcast named system-wide notifications that your external process observes.- UNIX Domain Socket located in the App Group container: your external creates and listens on a socket file within the shared App Group container, allowing the File Provider Extension direct connection via the file system path. This does require manual socket programming.
Sharing settings with the File Provider Extension
Like with other types of App Extensions, you are able to share NSUserDefaults between your main app and your File Provider Extension so long as they belong to the same App Group (you should make sure of this anyway!).
To share a NSUserDefaults you must use this class’ initWithSuiteName: init method, passing in the identifier of the shared app group. Both your main app, your File Provider Extension, and other applications or app extensions using this App Group can both read from and write to this NSUserDefaults.
Providing thumbnails for items
A key part of integrating smoothly with Finder and the Files app is providing relevant thumbnails or previews for your files. For materialised files, this is no issue; the system will use the local contents to generate this automatically. You, however, must implement a way to retrieve thumbnails for un-materialised items.
The File Provider API facilitates this through the NSFileProviderThumbnailingprotocol, which you should implement in your main File Provider Extension class. This protocol requires the implementation of one core method:
- Parameters:
itemIdentifiers: The unique IDs of the items for which the system wants a thumbnail.itemVersion: An optional specific version the system might be interested in (often related to the last known version). You might use this to check if a cached thumbnail is still valid.requestedSize: The desired size (in points) for the thumbnail image. This is a hint; you should aim to provide a thumbnail close to this size, but the system might scale it further. Thescalefactor of the current display is implicitly included (e.g., a 100x100 point request on a 2x Retina display implies a 200x200 pixel target).perThumbnailCompletionHandler: This closure must be called exactly once for the requesteditemIdentifiers. You pass the thumbnailData(e.g., JPEG or PNG data) generated or retrieved remotely on success, or anErroron failure.completionHandler: This closure must be called once after all processing for this request is finished, even if aperThumbnailCompletionHandlerwas called with an error. Passnilon overall success, or anErrorif a fundamental issue occurred preventing even an attempt.
- Return Value: You must immediately return a
Progressobject. You can update this object if thumbnail generation involves significant asynchronous work (like downloading).
Showing custom decorations
Beyond thumbnails, another way to visually communicate the status of your files directly within Finder or the Files app is through icon decorations – small badges or symbols presented alongside the item’s name. These are great for indicating custom states specific to your service.
This functionality is enabled by the NSFileProviderItemDecorating protocol, which you must implement in your NSFileProviderItem implementing class.
Providing decorations involves a collaboration between your custom NSFileProviderItem object and your File Provider Extension’s Info.plist:
- Your item provides identifiers. Your class that conforms to
NSFileProviderItemmust also conform toNSFileProviderItemDecorating. This protocol requires you to implement adecorationsproperty. This property returns an array of string identifiers (which you define) representing the decorations that currently apply to that specific item based on its state. - Your extension’s
Info.plistmaps identifiers to images. The system needs to know what visual image or symbol corresponds to each string identifier your item might return. This mapping is defined within theInfo.plistfile of your main File Provider Extension target.
Inside your File Provider Extension’s Info.plist file, you need to add the NSFileProviderDecorations key. This key holds a dictionary where each entry maps one of your custom string identifiers to the visual representation.
- Top Level Key:
NSFileProviderDecorations(Type: Dictionary) - Dictionary Keys: Your custom string identifiers (e.g.,
com.claucambra.fpExample.decoration.shared,com.claucambra.fpExample.decoration.locked) - Dictionary Values: Another Dictionary containing details about the visual:
BadgeImageType(String): Specifies where the image comes from. Must be one of:BundleResource: The image is an asset within your File Provider Extension’s bundle (e.g., inAssets.xcassets).Symbol: The image is an SF Symbol. This is often the easiest way for common concepts.
BundleResourceName(String): Required ifBadgeImageTypeisBundleResource. The name of the image asset (e.g.,"MyCustomLockIcon").SymbolName(String): Required ifBadgeImageTypeisSymbol. The name of the SF Symbol (e.g.,"lock.fill","person.2.fill","checkmark.icloud").Label(String): Required. A user-visible string describing the decoration’s meaning (e.g., “Shared Item”, “Locked”). Used for accessibility (VoiceOver) and potentially tooltips.Category(String, Optional): A string to group related decorations (e.g.,"SharingStatus","SyncState"). Primarily for organizational purposes, though the system might use it in the future.
<key>NSExtension</key>
<dict>
    <key>NSFileProviderDecorations</key>
    <dict>
        <key>com.claucambra.fpExample.decoration.shared</key>
        <dict>
            <key>BadgeImageType</key>
            <string>Symbol</string>
            <key>SymbolName</key>
            <string>person.2.fill</string>
            <key>Label</key>
            <string>Shared</string>
            <key>Category</key>
            <string>SharingStatus</string>
        </dict>
        <key>com.claucambra.fpExample.decoration.locked</key>
        <dict>
            <key>BadgeImageType</key>
            <string>Symbol</string>
            <key>SymbolName</key>
            <string>lock.fill</string>
            <key>Label</key>
            <string>Locked</string>
        </dict>
        <key>com.claucambra.fpExample.decoration.synced</key>
        <dict>
            <key>BadgeImageType</key>
            <string>Symbol</string>
            <key>SymbolName</key>
            <string>checkmark.circle.fill</string> <key>Label</key>
            <string>Synced</string>
            <key>Category</key>
            <string>SyncState</string>
        </dict>
         <key>com.claucambra.fpExample.decoration.customStatus</key>
        <dict>
            <key>BadgeImageType</key>
            <string>BundleResource</string>
            <key>BundleResourceName</key>
            <string>MyCustomStatusIcon</string> <key>Label</key>
            <string>Awaiting Approval</string> </dict>
    </dict>
</dict>
I’d recommend leveraging SF Symbols via the Symbol type for standard UI concepts like sharing, locking, checkmarks, errors, etc. It ensures visual consistency with the rest of the OS and handles different appearances (like dark mode) automatically and is a lot easier to work with.
class Item: NSObject, NSFileProviderItem, NSFileProviderItemDecorating {

	...

    var customWorkflowState: String? = nil

    var decorations: [NSFileProviderItemDecorationIdentifier]? {
        var applicableDecorations: [NSFileProviderItemDecorationIdentifier] = []
        if self.customWorkflowState == "pendingApproval" {
		    let decorationIdentifier = NSFileProviderItemDecorationIdentifier(
			    "com.mycompany.myapp.decoration.customStatus"
			)
            applicableDecorations.append(decorationIdentifier)
        }
        return applicableDecorations.isEmpty ? nil : applicableDecorations
    }
}
Presenting context menu actions
To add custom actions, you must declare them in your File Provider Extension’s Info.plist file under the NSExtension > NSExtensionFileProviderActions key. Each action declaration includes the following keys:
NSExtensionFileProviderActionIdentifier: used in your code to recognise and handle a given actionNSExtensionFileProviderActionName: displayed to the user in the context menuNSExtensionFileProviderActionActivationRule: can enable or disable an action based on the current context, potentially querying information from the item
<key>NSExtensionFileProviderActions</key>
<array>
	<dict>
		<key>NSExtensionFileProviderActionIdentifier</key>
		<string>com.example.MyFileProvider.setRating</string>
		<key>NSExtensionFileProviderActionName</key> <string>Rate</string>
		<key>NSExtensionFileProviderActionActivationRule</key> <string>SUBQUERY( fileproviderItems, $fileproviderItem, $fileproviderItem.userInfo.rank != nil ).@count > 0</string>
	</dict>
</array>
You can handle these actions by implementing the NSFileProviderCustomAction protocol in the main class of your File Provider Extension. In func performAction(identifier: NSFileProviderExtensionActionIdentifier, onItemsWithIdentifiers: [NSFileProviderItemIdentifier], completionHandler: ((any Error)?) -> Void) -> Progress, you:
- Identify the action via
actionIdentifier. - Get the
itemIdentifiersof the selected items. - Perform the actual action.
- Call
completionHandlerwhen the action is complete. - Return a
Progressobject immediately. If your action performs asynchronous work (like network requests), update thisProgressobject accordingly to provide feedback.
Activation rules
The activation rule will decide whether or not actions are displayed to the user. Its value is a predicate string using NSPredicatesyntax which the system will evaluate against an array of the selected NSFileProviderItem objects (available as fileproviderItems).
SUBQUERY ( fileproviderItems, $fileproviderItem, $fileproviderItem.uploaded == YES ).@count > 0
Unfortunately, the current documentation does not provide a comprehensive list of the available properties you can query (in fact, the documentation contains typos in some of the example properties used!). Based on my experimentation, some of the NSFileProviderItem properties are available such as uploaded and downloaded.
As a fallback, or for custom state, you can rely on implementing your own properties via the userInfo dictionary property of NSFileProviderItem, which you can access via predicate too.
SUBQUERY( fileproviderItems, $fileproviderItem, $fileproviderItem.userInfo."com.example.testBit" == YES ).@count > 0
If you don’t care about selectively activating the context menu entry, you may just use TRUEPREDICATE instead of writing a SUBQUERY.
Providing users with more interactivity
You would typically implement NSFileProviderCustomAction for simple, background actions that don’t require direct user interaction beyond selecting the menu item. For actions needing user input, confirmation, progress display beyond a simple spinner, or any custom interface, you should use a File Provider UI Extension. You can create this new target via an Xcode template.
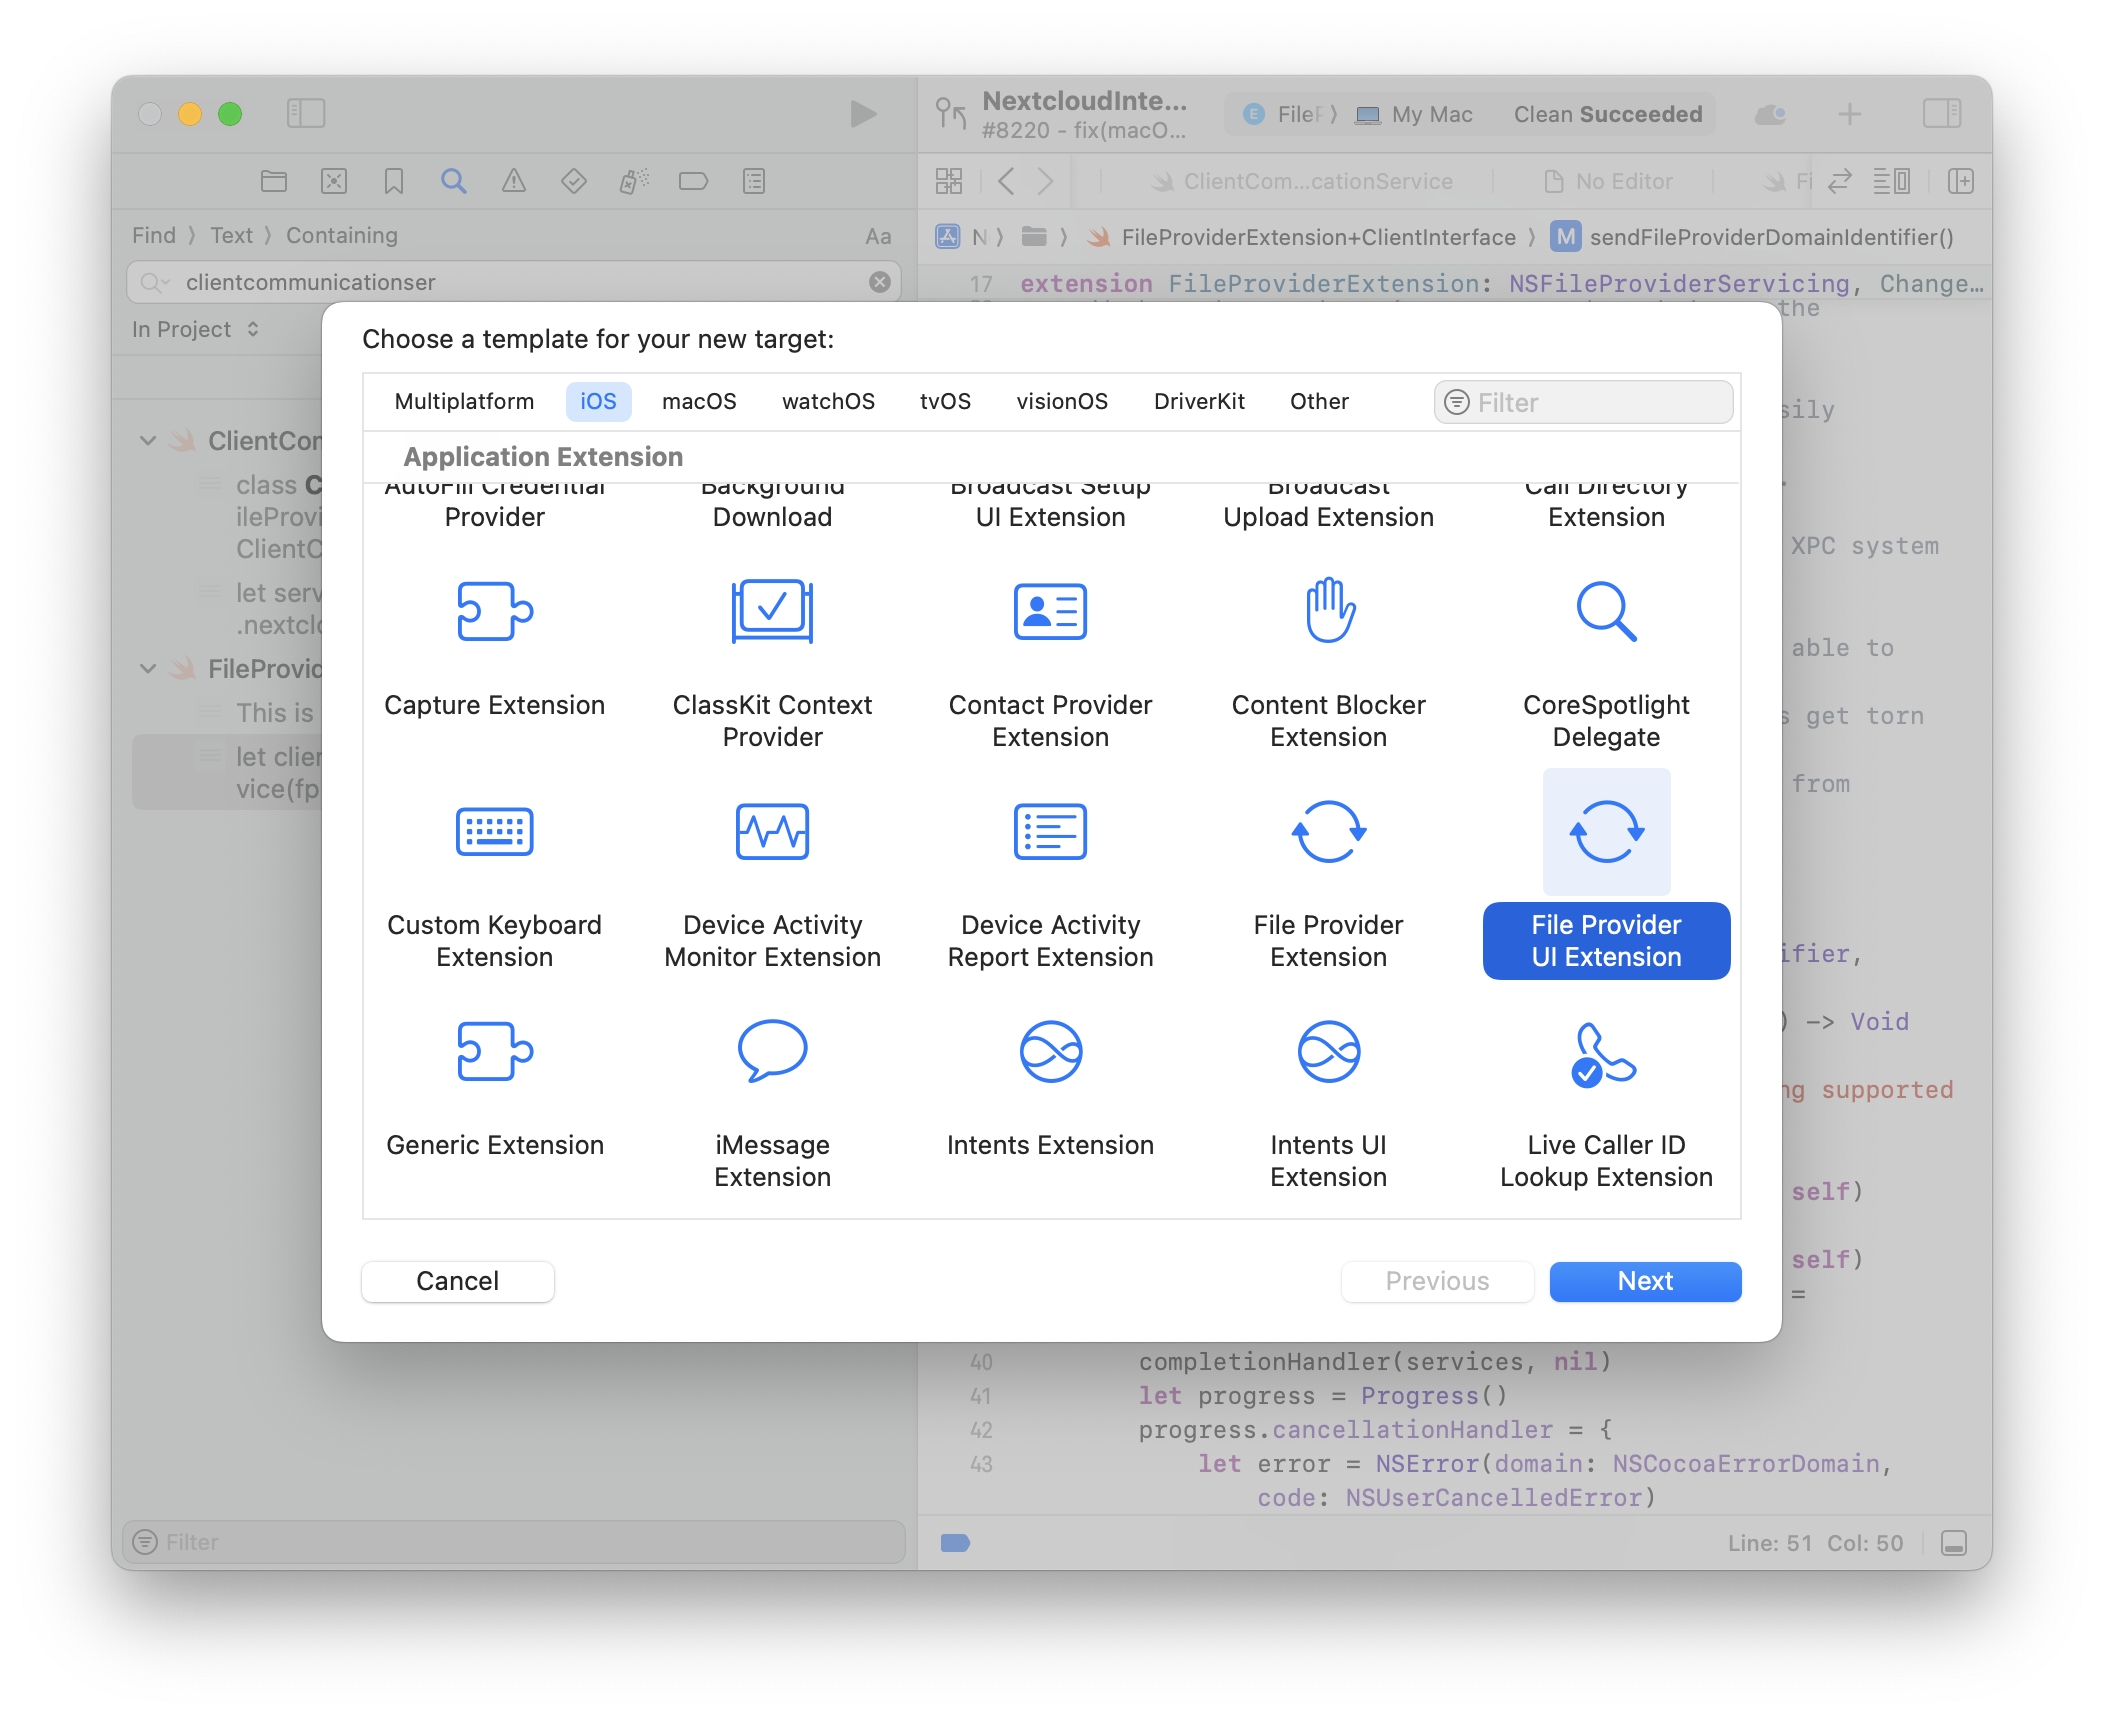
Though this target only appears in the iOS section, it works on macOS too. For some guidance on using this as a multi-platform target, you may refer to the section on creating the File Provider Extension target.
For an action to launch the UI Extension, its definition must reside in the Info.plist file of the File Provider UI Extension target itself, not the main File Provider Extension target. Actions defined only in the main extension’s plist will be handled by NSFileProviderCustomAction.performAction(…). You should define them in the same manner as in the File Provider Extension.
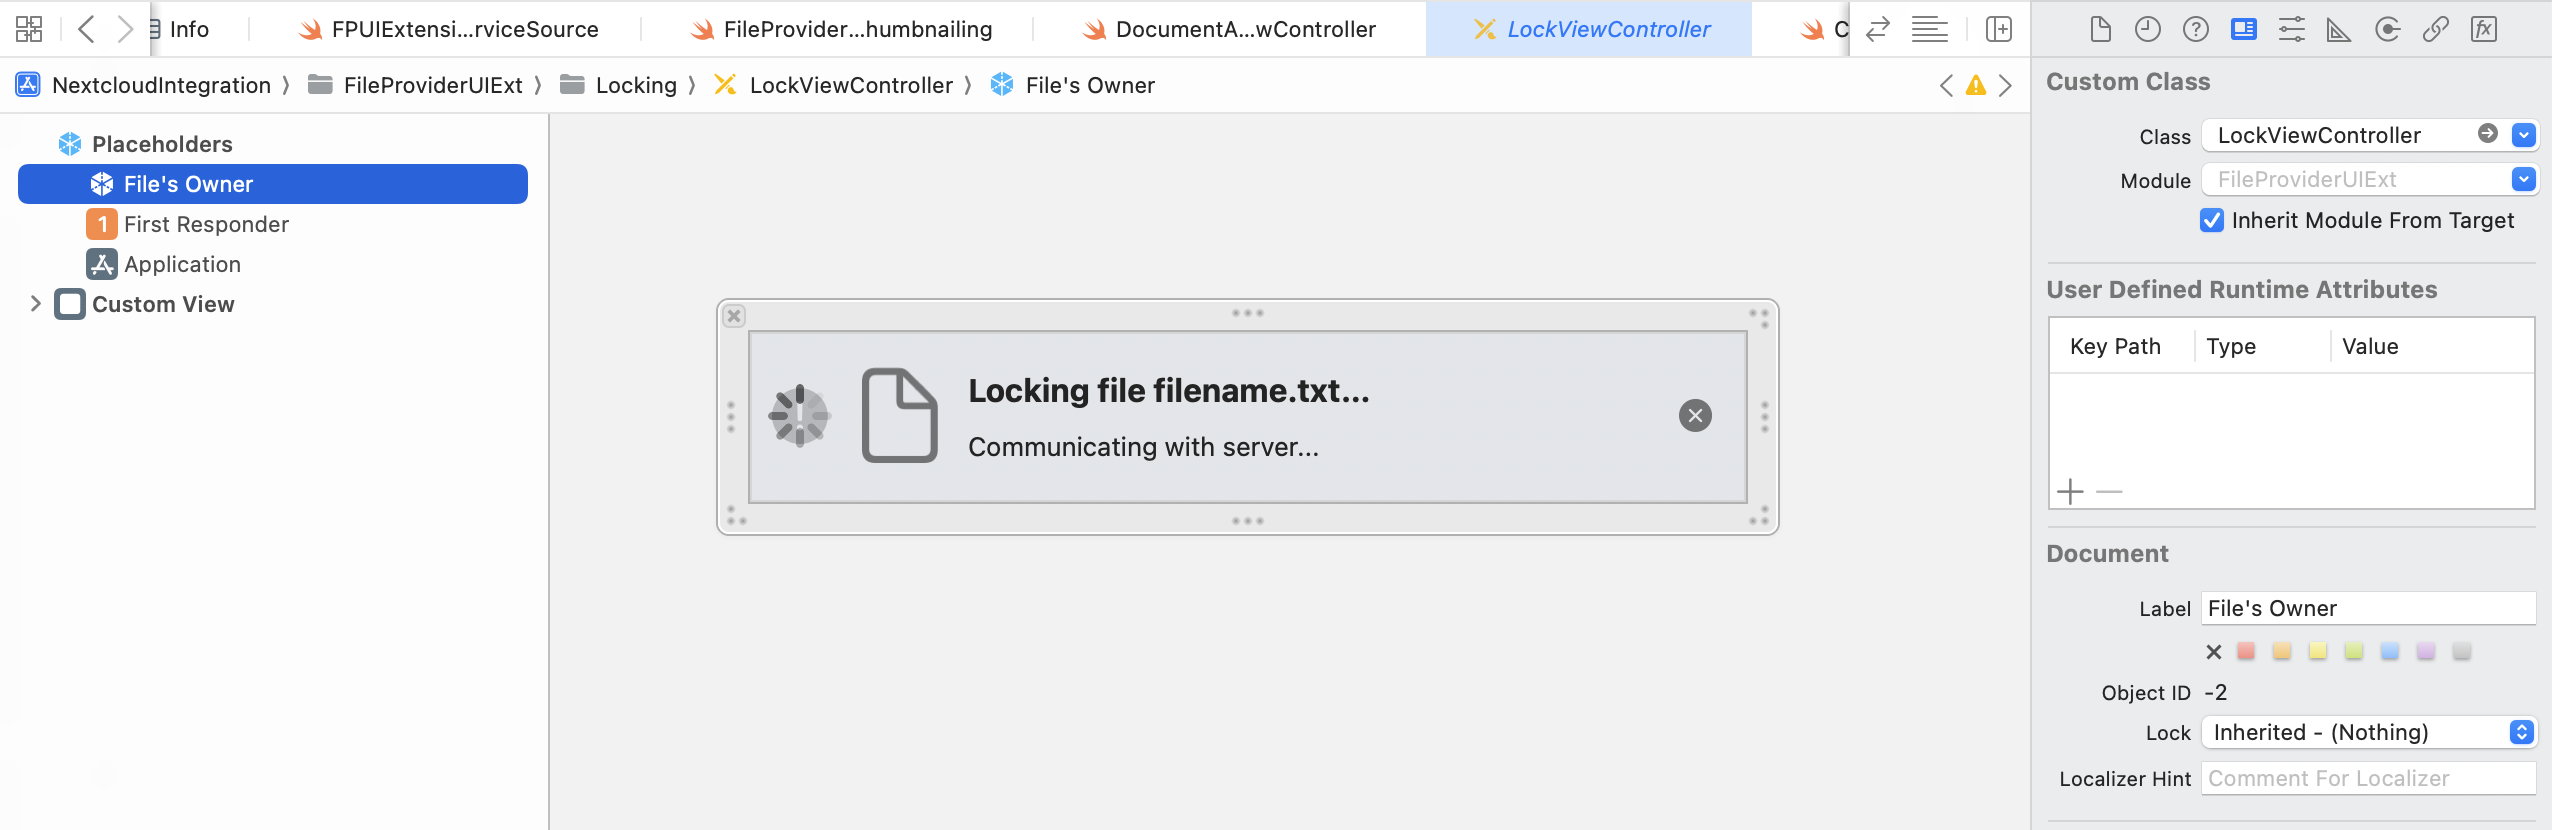
Triggering an action defined in this target will start a File Provider UI Extension process and open a view within the Finder window. The default Xcode target will create a DocumentActionViewController class which subclasses FPUIActionExtensionViewController. You are expected to override func prepare(forAction: String, itemIdentifiers: [NSFileProviderItemIdentifier]) and to handle setting up the UI for users based on the action identifier and the provided items. The system provides you a small view panel within Finder on macOS to draw in.
The default template, as it is designed for iOS, will create a Storyboard file for you to implement your UI in. For macOS, you should create a different Storyboard file and set it’s class to the DocumentActionViewController, as in the iOS file. Alternatively, you can use XIBs; in this case, your DocumentActionViewController should override loadView to set self.view to an empty NSView, create an NSViewController associated to whichever XIB you create, and manually add this view controller and its view as a child of the DocumentActionViewController and its (empty) view, respectively.
// Simplified example using view controllers and XIBs on macOS

class DocumentActionViewController: FPUIActionExtensionViewController {

    func prepare(childViewController: NSViewController) {
        addChild(childViewController)
        view.addSubview(childViewController.view)

        NSLayoutConstraint.activate([
            view.leadingAnchor.constraint(equalTo: childViewController.view.leadingAnchor),
            view.trailingAnchor.constraint(equalTo: childViewController.view.trailingAnchor),
            view.topAnchor.constraint(equalTo: childViewController.view.topAnchor),
            view.bottomAnchor.constraint(equalTo: childViewController.view.bottomAnchor)
        ])
    }

    override func prepare(
        forAction actionIdentifier: String, itemIdentifiers: [NSFileProviderItemIdentifier]

    ) {
        switch (actionIdentifier) {
        case "com.claucambra.fpExample.FileProviderUIExtension.ShareAction":
            prepare(childViewController: ShareViewController(itemIdentifiers))
        case "com.claucambra.fpExample.FileProviderUIExtension.LockFileAction":
            prepare(childViewController: LockViewController(itemIdentifiers))
        default:
            return
        }
    }

    override func prepare(forError error: Error) {
        print("Preparing for error: \(error.localizedDescription)")
    }

    override public func loadView() {
        self.view = NSView()
    }
}
You should then perform the actual action. This often involves communicating with your File Provider Extension process using the XPC mechanism (described earlier) to tell it to perform the underlying task. While this action is being performed, you should update the UI based on the progress/result.
Call completionHandler() or cancelRequest(withError:) on the FPUIActionExtensionViewController‘s extensionContext when the action is done or fails.
The system will also invoke your File Provider UI Extension for actions involving an error that trigger the display of UI elements with actionable items (e.g. when you report .notAuthenticated, displaying a ribbon in Finder with a “Sign in” button). You should handle this via FPUIActionExtensionViewController’s prepare(forError error: Error) method, implementing it similarly to prepare(forAction actionIdentifier: String, itemIdentifiers: [NSFileProviderItemIdentifier].
Customising the sidebar icon
When your File Provider domain appears in the Finder sidebar under “Locations,” you can replace the default generic folder icon with a custom one representing your app or service. This customisation is configured within the Info.plist file of your File Provider Extension target.
- Top Level Key:
CFBundleIcons(Type: Dictionary)- Sub-Key:
CFBundlePrimaryIcon(Type: Dictionary)- Sub-Key:
CFBundleSymbolName(Type: String)
- Sub-Key:
- Sub-Key:
The value for CFBundleSymbolName determines the icon displayed. The simplest and most common approach is to use the name of an SF Symbol as the value for CFBundleSymbolName. SF Symbols automatically adapt to light/dark mode, selection states, and different sizes, ensuring visual consistency with the rest of macOS.
<?xml version="1.0" encoding="UTF-8"?>
<!DOCTYPE plist PUBLIC "-//Apple//DTD PLIST 1.0//EN" "http://www.apple.com/DTDs/PropertyList-1.0.dtd">
<plist version="1.0">
<dict>
    <key>CFBundleIcons</key>
    <dict>
        <key>CFBundlePrimaryIcon</key>
        <dict>
            <key>CFBundleSymbolName</key>
            <string>cloud.bolt.fill</string>
        </dict>
    </dict>
    <key>NSExtension</key>
    <dict>
        <key>NSExtensionPointIdentifier</key>
        <string>com.apple.fileprovider-nonui</string>
        <key>NSExtensionPrincipalClass</key>
        <string>$(PRODUCT_MODULE_NAME).FileProviderExtension</string>
        <key>NSExtensionFileProviderDocumentGroup</key>
        <string>$(APP_GROUP_IDENTIFIER)</string>
        <key>NSExtensionFileProviderSupportsEnumeration</key>
        <true/>
	</dict>
</dict>
</plist>
Using Custom Symbols
You can also use a custom symbol. Assuming you have an SVG design, you must:
- Validate the icon: use the SF Symbols app (
File > Validate Templates) or Xcode to ensure your SVG conforms to the required template format. - Add it to an Asset Catalog: Add the validated SVG file to the File Provider Extension’s Asset Catalog (
Assets.xcassets). In Xcode, selectEditor > Add New Asset > Symbol Image Setand drag your SVG into the set. Give the Symbol Image Set a descriptive name (e.g.,MyCustomBrandIcon). - Reference the icon’s name in Info.plist: Set the
CFBundleSymbolNamekey in the extension’sInfo.plistto the name you gave the Symbol Image Set in the asset catalog (e.g.,MyCustomBrandIcon).
For sidebar icons, it’s strongly recommended to use a template image. This is typically a monochromatic image (often black) where the shape is defined by the non-transparent pixels. macOS will automatically re-colour template images appropriately for light/dark mode, selection states, and vibrancy effects, ensuring your icon looks correct in all contexts. You can designate an image as a template image in the Asset Catalog inspector by setting its “Render As” property to “Template Image”.
Sidebar icons are small, so you should provide versions suitable for @1x and @2x resolutions.
Testing
Unfortunately, testing the File Provider Extension is not as easy as testing a normal application. An approach I have found to be relatively effective is to separate the core functionality for the extension into an external Swift package that has its own unit test suite.
This approach, however, does not allow you to directly test the behaviour of your code as it is used by the system and the app extension. A solution is offered by Apple in providing testing modes for File Provider domains. This allows you to manually run file operations on a File Provider domain that has been put into testing mode. You can therefore create integration tests where you create new domains for test purposes.
You must add the com.apple.developer.fileprovider.testing-mode entitlement to your File Provider Extension target before assigning a non-empty value to a domain’s testingModesproperty. You can only use this entitlement during testing and development, so remove it before you submit your app to TestFlight or the Mac App Store.
Debugging can also be tricky; you often need to manually attach Xcode’s debugger to the specific extension process (FileProviderExtension or FileProviderUIExtension) after it’s been launched by the system (e.g., by navigating in Finder or triggering a context menu). Use the Debug > Attach to Process menu in Xcode.
Conclusion
We’ve journeyed through quite a bit of Apple’s File Provider API! The content here should hopefully equip you with enough information to be able to implement a fully-featured and modern sync client for Apple platforms.
A lot of these information was gleamed through reading class headers, trial and error, and a lot of online sleuthing over the past two years of me working with this API (as you’ve probably gathered, the official documentation sometimes leaves you wanting more). Feel free to reach out to me if I made any mistakes and I’ll make sure to correct them.
Happy syncing!